How To Use E6000 Glue on Wood: Expert Tips
Understanding Wood Glue
Wood glue is essential for woodworking projects, ensuring strong and durable bonds between wood pieces. This section covers the fundamentals of choosing the right type of wood glue and understanding how staining affects its effectiveness.
Choosing the Right Type
Selecting the right wood glue depends on the project and the specific requirements for bonding. Various types of wood glue are available, each with unique properties and applications:
| Type of Glue | Properties | Applications |
|---|---|---|
| Polyvinyl Acetate (PVA) Glue | Good for porous materials, easy cleanup | General woodworking, crafting |
| Epoxy Glue | Strong, water-resistant, bonds non-porous surfaces | Outdoor projects, repairing broken wood |
| Polyurethane Glue | Moisture-resistant, expands as it cures | Joint assembly, high-stress applications |
| Hide Glue | Reversible bond, historical accuracy | Antique restoration, musical instruments |
| Cyanoacrylate (CA) Glue | Quick bonding, small applications | Minor repairs, model making |
- PVA Glue: Ideal for bonding bare wood due to its ability to seep into the pores, forming a strong joint. Commonly used for general woodworking and crafts.
- Epoxy Glue: Suitable for projects requiring a robust bond and resistance to water. It bonds non-porous surfaces effectively.
- Polyurethane Glue: Excellent for use in high-moisture environments due to its water-resistant properties. It expands as it cures, filling gaps in wood joints.
- Hide Glue: Preferred for projects requiring a reversible bond, such as antique restoration or building musical instruments.
- Cyanoacrylate (CA) Glue: Best for quick repairs and precise applications. It bonds instantly to small surfaces.
For a comprehensive comparison between different adhesives, see our articles on contact cement versus epoxy and rubber cement versus contact cement.
Effects of Staining Wood
Staining wood can significantly impact the bonding efficiency of wood glue. When wood is stained, the stain penetrates and seals the wood pores, reducing the glue’s ability to penetrate and form a strong bond.
Polyvinyl acetate (PVA) glue is particularly affected by staining because it relies on bonding with the wood itself rather than the surface finish. Stained wood blocks the glue from adhering properly, leading to weaker joints (Extra Context).
To ensure strong adhesion:
- Apply glue to bare wood surfaces whenever possible.
- Avoid staining areas where joints will be glued until after the assembly.
- If staining before assembly is necessary, consider using glue types better suited for bonding to finished surfaces, such as high-grade contact cement. Contact cement can adhere well to finished wood, potentially lasting up to fifty to sixty years (Extra Context).
Drying and curing times for wood glue are also critical. Most wood glues dry within an hour but take up to 24 hours to cure completely. Factors like temperature, humidity, and wood moisture can influence these times (Extra Context). Proper clamping is essential to ensure joint strength—unstressed joints typically need clamping for 30 minutes to an hour, while stressed joints should be clamped for 24 hours.
For detailed guidance on different glue types and applications, check out our articles on liquid nails versus pl premium and loctite blue versus red.
Working with E6000 Glue
E6000 Plus Features
E6000 Plus is renowned for its versatility and strong adhesion properties. Suitable for both indoor and outdoor applications, it offers excellent bonding to wood and other materials. Key features include:
- Waterproof: Safe for use in humid conditions.
- UV Resistant: Ideal for outdoor applications.
- Temperature Tolerant: Operates effectively between -40 to 200 °F (-40 to 93 °C) (E6000 Plus).
- Washer/Dryer Safe: Durable bond that withstands washing and drying cycles.
Preparation for Wood Surfaces
Before applying E6000 glue, proper preparation of the wood surface is crucial to achieve optimal adhesion:
- Clean the Surface: Ensure the wood is clean and dry. Any dirt or residue can prevent the glue from bonding properly (E6000 Plus).
- Roughen Smooth Areas: If working with smooth, non-porous wood, lightly roughen the surface using sandpaper. This helps the glue to grip better (E6000 Plus).
- Temperature Conditions: Apply E6000 glue in a temperature range between 50 to 90 °F (10 to 32 °C) for best results (E6000 Plus).
Application Techniques
Applying E6000 glue correctly ensures a strong, long-lasting bond:
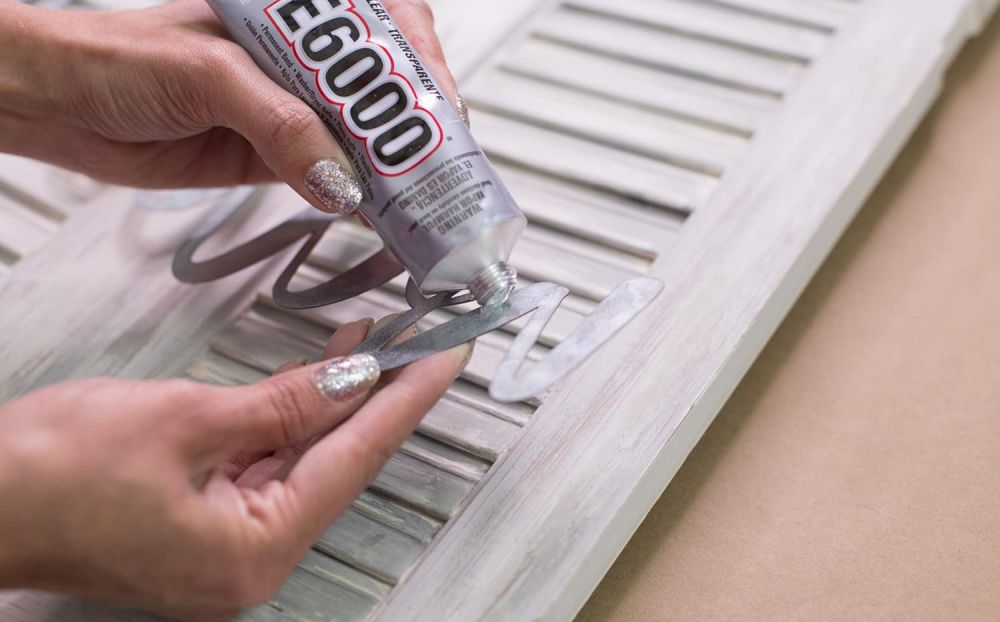
- Apply Glue: Dispense a thin, even layer of E6000 glue onto the wood surface. For emergency repairs, mist the area with a bit of water before applying the glue to accelerate cure time (E6000 Plus).
- Join Surfaces: Press the glued surfaces together firmly. Ensure even contact over the entire area to facilitate a strong bond.
- Clamping: If possible, use clamps to hold the wood pieces together while the adhesive sets. This helps maintain pressure and alignment.
- Drying Time: Allow the glue to set for 2-10 minutes, and then leave it undisturbed for at least 24 hours to cure fully (E6000 Plus).
For additional guidance and techniques for using E6000 glue on various materials, check out our section on adhesion tips and techniques.
E6000’s versatile performance makes it suitable for diverse applications. Explore differences and similarities with other adhesives in our articles on 527 glue vs e6000 and e6000 vs shoe goo.
Adhesion Tips and Techniques
Ensuring a proper bond when using E6000 glue on wood involves understanding several key factors, including temperature considerations, clamping and drying times, and the use of solvents for cleanup. Here are expert tips to achieve the best results.
Temperature Considerations
The temperature plays a crucial role in the efficacy of E6000 glue, especially when working with wood. The ideal application range for E6000 Plus is 50 to 90 ºF (10 to 32 ºC). This ensures the adhesive properly bonds the surfaces. Once fully cured, the adhesive can withstand temperatures from -40 to 200 ºF (-40 to 93 ºC) intermittently (E6000 Plus).
| Temperature Range | Application Effectiveness |
|---|---|
| 50 – 90 ºF (10 – 32 ºC) | Optimal |
| Below 50 ºF (10 ºC) | Slower Cure Time |
| Above 90 ºF (32 ºC) | Risk of Quick Drying |
For quick repairs, lightly misting the substrate with moisture before applying the adhesive can speed up the cure time (E6000 Plus).
Clamping and Drying Times
Proper clamping and drying times are vital to achieving a strong bond with E6000 glue. The bond will start getting tacky in approximately 2 minutes, begin setting in around 10 minutes, and achieve a full cure between 24 and 72 hours. The drying process can be influenced by factors such as temperature and humidity.
| Stage | Time | Influencing Factors |
|---|---|---|
| Tacky | ~2 Minutes | Temperature, Humidity |
| Initial Set | ~10 Minutes | Temperature, Humidity |
| Full Cure | 24 – 72 Hours | Temperature, Humidity |
Wood moisture content also affects drying times: higher temperatures, drier wood, and lower humidity speed up drying, while lower temperatures, wetter wood, and higher humidity slow it down..
Solvent Use and Cleanup
Cleaning up after using E6000 glue can be straightforward with the right solvents. For leftover adhesive, using a small amount of acetone or nail polish remover can soften the glue, making it easier to wipe away. It’s essential to approach this step cautiously to avoid damaging the wood surface.
- For heavy-duty cleanup, stronger solvents might be required, such as those found in 3m adhesive remover vs. goo gone or rapid remover vs. goo gone.
- Safety tip: Always work in a well-ventilated area and wear protective gloves when handling solvents.
By understanding these adhesion tips and techniques, one can achieve a successful and lasting bond using E6000 glue on wood. For more detailed comparisons and guides on adhesives, visit our related articles like liquid nails vs. pl premium and loctite 510 vs. 515.
Tips for Specific Materials
E6000 glue is versatile and can be used effectively on various materials. Here are best practices for using it with specific materials.
Gluing Plaster on Wood
When using E6000 glue to adhere plaster to wood, it’s important to ensure both surfaces are clean and dry. The glue works to fill in small gaps and provide a strong bond but should be applied sparingly to avoid creating a thick bond line. Additionally, taking steps to smooth out glued areas and ensure they are gap-free is essential. These areas may need to be filled, sanded, and repainted before the final finish.
Step-by-step:
- Clean both the plaster and wood surfaces.
- Apply a small amount of E6000 to the wood.
- Press the plaster onto the glue.
- Hold or clamp the pieces together for a strong bond.
- Smooth any gaps or cracks, if necessary.
For areas that are difficult to bond or require extra strength, using a good wood glue in combination with E6000 may be beneficial. For more on wood glues, explore barge cement vs. contact cement.
Attaching Rhinestones
E6000 is excellent for attaching rhinestones to surfaces like fabric, wood, and paper. Its strong adhesion, waterproof, and UV-resistant features make it suitable for decorative projects.
To attach rhinestones:
- Clean the surface area.
- Apply E6000 to the back of the rhinestone.
- Position the rhinestone on the desired spot.
- Allow the glue to cure for 24 hours for a strong bond.
For tips on other adhesives, see gem tac vs. e6000 for a comparison.
Adhering Acrylic Rhinestones to Glass
When adhering acrylic rhinestones to glass, a 2-part epoxy glue is often recommended for a strong and transparent bond. However, E6000 can also be used effectively and is known for its durability and versatility.
Steps:
- Clean the glass surface thoroughly to remove any dust or oil.
- Apply a small dot of E6000 to the back of the rhinestone.
- Press the rhinestone firmly onto the glass.
- Allow the glue to cure for 24 to 72 hours to ensure a strong adhesion.
For additional options and comparison, check the article on my rhinestoning experience which dives into the effects of using various adhesives on rhinestones.
Explore more about different adhesives and their applications by visiting our article on contact cement vs epoxy.
Alternatives and Recommendations
Contact Cement for Finished Wood
Contact cement is an effective adhesive for finished wood, especially when dealing with surfaces treated with oil or varnish. Unlike other adhesives, contact cement forms a strong and durable bond that can potentially last for fifty to sixty years if a high-grade variety is used. This makes it a preferred choice for long-term projects where sustained adhesion is crucial.
Double-Sided Tape Solutions
For more straightforward tasks, a high-quality double-sided tape can be an excellent solution. This method is particularly useful for attaching frame and panel drawer fronts to drawer boxes. Apply the tape near the drawer pulls for a secure fit (Fine Woodworking Forum). Here’s a comparison of a few popular tape options:
| Tape Type | Bond Strength | Suitable For |
|---|---|---|
| Alien Tape | High | Versatile surfaces including wood |
| Gorilla Tape | Very High | Heavy-duty applications |
| Command Strips | Medium | Lightweight items |
For more on tape comparisons, check out our guide on alien tape vs. gorilla tape.
Secure Attachment Methods
Using hardware can often provide the most reliable attachment, especially for projects requiring extra holding power. One effective method for attaching drawer fronts involves using angled screws to achieve longer penetration length, thereby offering firmer and more secure attachment (Fine Woodworking Forum).
| Method | Advantages | Best For |
|---|---|---|
| Angled Screws | Firm holding, long penetration | Heavyweight drawer fronts |
| Double-Sided Tape | Quick, no drilling needed | Lightweight and medium-weight items |
| Contact Cement | Long-lasting bond | Finished wood with oil/varnish |
By understanding the different alternatives and their specific benefits, you can choose the best method for your woodworking projects. For related recommendations and comparisons, visit e6000 vs. shoe goo and contact cement vs. epoxy on our website.
Ensuring Long-Term Bonding
To achieve a durable bond when using E6000 glue on wood, it is essential to understand the differences between wood bonding and finish bonding, as well as to employ effective attachment strategies.
Wood vs. Finish Bonding
When gluing wood, it is important that the adhesive bonds directly to the wood fibers rather than to any finish on the wood. If the glue adheres only to the finish, the bond will be weak and likely to fail over time (Fine Woodworking Forum). Thus, for a reliable adhesion, preparation is key:
- Clean and Sand: To ensure a strong bond, the wood surface should be clean and free of finishes. Sanding the area to be glued will expose fresh wood fibers, increasing the adhesive’s effectiveness.
| Step | Action |
|---|---|
| 1 | Clean the wood surface to remove dust and debris. |
| 2 | Sand the area to ensure no finish remains. |
| 3 | Wipe the surface with a tack cloth to remove any remaining particles. |
- Direct Application to Wood: Apply the E6000 glue directly to the sanded wood surface. Ensure the glue penetrates the wood fibers for a solid bond.
Effective Attachment Strategies
Implementing the following strategies will ensure a secure and long-lasting bond when using E6000 glue on wood.
- Proper Temperature and Conditions:
- E6000 glue works best at temperatures between 70°F and 85°F (21°C to 29°C). Ensure the working environment falls within this range for optimal adhesion. Read more on temperature considerations.
- Clamping and Drying Times:
- Use clamps to hold the pieces together firmly while the glue cures. This prevents movement and ensures a solid bond.
- Allow sufficient drying time. E6000 typically sets in 10 minutes, but a full cure takes 24 to 72 hours, depending on the environment. For more information, visit clamping and drying times.
| Condition | Duration |
|---|---|
| Initial Set Time | 10 minutes |
| Full Cure Time | 24-72 hours |
- Avoid Excess Adhesive:
- Using too much glue can lead to weak, uneven bonds. Apply a thin, even layer of E6000 glue to the sanded wood surface. Excess adhesive can be wiped away before it dries.
- Solvent Cleanup:
- Any excess E6000 glue can be cleaned with acetone or rubbing alcohol before it cures. After curing, it can be peeled off carefully. Refer to our guide on solvent use and cleanup for more details.
Following these strategies will help ensure a robust, long-term bond when using E6000 glue on wood. For additional recommendations on adhesives and bonding techniques, consider reading our articles on contact cement for finished wood and double-sided tape solutions.
