Loctite 510 vs. 515: Gasket Maker Comparison Guide
Loctite 510 Overview
Understanding the characteristics and applications of Loctite® 510 is crucial for users who need a reliable sealant for various industrial purposes.
Characteristics of Loctite 510
Loctite® 510 is well-regarded for its high-temperature resistance and anaerobic curing properties. This form-in-place sealant is specifically designed for use with rigid flanges, such as those found in transmissions and motor casings (Henkel Adhesives). Below are the key characteristics of Loctite® 510:
- Temperature Resistance: Can withstand high temperatures, making it suitable for demanding environments.
- Substrate Compatibility: Recommended for aluminum and steel substrates.
- Gap-Fill Capability: Unprimed gap-fill of 0.25 mm (0.01″), ideal for fine gaps.
- Cure Activation: Can cure effectively at low temperatures (below 5°C) when used with Loctite® SF 7649 activator.
- Thermoset Polymers: Upon curing, forms highly resistant thermoset polymers that provide excellent resistance to gasoline, diesel, engine oil, water, glycol, acids, alkalis, and hydraulic fluid (Henkel Adhesives).
Applications of Loctite 510
The robust properties of Loctite® 510 make it suitable for a wide range of industrial applications. Below are some common uses:
- Rigid Flanges: Loctite® 510 is particularly effective for sealing and securing rigid flanges in transmissions and motor casings.
- High-Temperature Environments: Ideal for applications that involve high operating temperatures, thanks to its superior heat resistance.
- Passive Metals: Suitable for high-temperature applications with passive metals or low-temperature conditions when used together with Loctite® SF 7649 activator (Henkel Adhesives).
Key benefits of using liquid gaskets like Loctite® 510 include ease of application and cost savings. Unlike pre-cut gaskets, liquid gaskets can be easily dispensed onto a wide range of flange patterns, reducing inventory costs while providing long-lasting, leak-free seals.
For a detailed comparison of Loctite® 510 and other similar products, see our guide on Loctite 510 vs. 518. If you’re interested in more adhesive comparisons, consider reading about contact cement vs. rubber cement or loctite blue vs. red.
Loctite 515 Overview
Characteristics of Loctite 515
LOCTITE® 515 is an anaerobic-curing flange sealant that cures when confined in the absence of air between close-fitting metal surfaces. It provides a reliable seal and fills gaps up to 0.25mm (0.01″). It is commonly used as a form-in-place gasket for various mechanical components. Key characteristics include:
- Anaerobic Curing: The sealant cures when air is not present, ensuring a secure and durable seal between metal surfaces.
- Gap-Filling Ability: It effectively fills gaps up to 0.25mm, enhancing its versatility for different applications.
- Fixture Time: Provides a 30-minute fixture time, allowing for quick installation and reduced downtime.
- Fluorescence: Fluoresces under UV light, permitting easy visual inspection to ensure proper application.
More details can be found on the Henkel website.
Applications of Loctite 515
LOCTITE® 515 is versatile, making it suitable for a wide variety of applications. It is often used in automotive and industrial environments where durable and reliable seals are essential. Typical applications include:
- Pumps: Providing leak-free seals in pump housings.
- Thermostats: Ensuring secure gasket seals for thermostat assemblies.
- Compressors: Sealing flanges in compressor units.
- Transmission Housings: Offering robust seals for transmission systems.
- Axle Covers: Preventing leaks in axle cover assemblies.
| Application Areas | Description |
|---|---|
| Pumps | Used as a sealant in pump housings to prevent leaks. |
| Thermostats | Creates secure seals in thermostat assemblies. |
| Compressors | Seals flanges in compressor units effectively. |
| Transmission Housings | Ensures strong seals in transmission systems. |
| Axle Covers | Prevents leakage in axle cover assemblies. |
For more comprehensive guidance on preparing surfaces for Loctite 515 application, refer to our detailed instructions:
- Surface Cleaning: Use LOCTITE® SF 790 to remove residues.
- Degreasing: Employ LOCTITE® SF 7070 to degrease and clean.
- Activator Application: In situations where cure speed is slow, apply LOCTITE® SF 7649 activator.
Further applications and best practices can be found in related topics like loctite 510 vs. 518 and rubber cement vs contact cement.
For those interested in a comparison with other adhesives and sealants, refer to:
By understanding these characteristics and applications, users can maximize the efficacy of LOCTITE® 515 in their specific use cases, ensuring strong and reliable seals for a variety of mechanical components.
Product Comparison
Loctite 510 vs. Loctite 515
When choosing between Loctite 510 and Loctite 515, it’s essential to understand the specific characteristics and applications of each product.
Loctite 510 is a high-performance gasketing product known for its high temperature and chemical resistance. This makes it ideal for use on rigid flanges where extreme conditions are a concern (INOSAKI).
Loctite 515 is a medium-strength gasketing product suitable for machined metal flanges with a 30-minute fixture time and can fill gaps up to 0.25 mm. This product is specifically formulated for applications where a quick setting time is advantageous (INOSAKI).
Key Differences between Loctite 510 and Loctite 515
| Features | Loctite 510 | Loctite 515 |
|---|---|---|
| Temperature Resistance | High | Medium (Loctite) |
| Chemical Resistance | Yes | Not specifically indicated |
| Strength | High | Medium (Loctite) |
| Application | Rigid flanges | Machined metal flanges, gap filling up to 0.25 mm |
| Fixture Time | Varies based on conditions | 30 minutes (INOSAKI) |
Loctite 510 excels in high-temperature environments and offers superior chemical resistance, making it suitable for demanding applications. In contrast, Loctite 515 is designed for machined metal flanges with a medium strength and quick fixture time, offering convenience for tasks requiring fast completion.
For more details on similar comparative guides, refer to our articles like loctite 510 vs. 518 and loctite pl 500 vs. pl premium, which help users understand the diverse applications and capabilities of different types of adhesive products.
Surface Preparation
Preparing Surfaces for Loctite 510
Proper surface preparation is pivotal for achieving an effective seal with Loctite 510. Loctite 510 is a high-temperature resistant, form-in-place anaerobic curing sealant ideal for rigid flanges such as those in transmissions and motor casings (Henkel Adhesives). Follow these steps to ensure optimal performance:
- Clean the Surface: Use LOCTITE® SF 790 to remove any residual material from previous gaskets or sealants.
- Degrease and Clean: Apply LOCTITE® SF 7070 to degrease and thoroughly clean the surfaces.
- Activate if Necessary: If working with passive metals or at low temperatures (below 5°C), use LOCTITE® SF 7649 activator to increase the cure speed. This can be essential for achieving a reliable, long-lasting seal under challenging conditions (Henkel Adhesives).
Preparing Surfaces for Loctite 515
For Loctite 515, which is designed for use with close-fitting metal surfaces and can be particularly effective under low-temperature conditions, proper surface preparation is similarly important (Henkel). Here’s how to prepare surfaces effectively:
- Remove Residues: Just like with Loctite 510, start by removing all residue from previous applications using LOCTITE® SF 790.
- Degrease and Clean: Clean the surfaces with LOCTITE® SF 7070 to remove grease and contaminants.
- Use Activator: If the cure speed is too slow, especially due to passive metals or low temperatures, apply LOCTITE® SF 7649 activator.
By following these steps, you ensure that the surfaces are well-prepared for the application of Loctite 510 or Loctite 515, leading to a more efficient and effective sealing process. For more information on comparing these products, visit loctite 510 vs. 518.
Best Practices for Application
Proper application of gasket makers is essential to ensure effective sealing and long-lasting results. Below are best practices for applying Loctite 510 and Loctite 515.
Applying Loctite 510
LOCTITE® 510 is a high-temperature resistant, form-in-place anaerobic-curing sealant, ideal for rigid flanges, particularly in transmissions and motor casings. Here are the steps to apply Loctite 510:
- Clean and Prepare Surfaces:
- Ensure that the surfaces are clean, dry, and free from oil, grease, and debris.
- Use a suitable cleaner to remove contaminants from the surfaces.
- Apply the Sealant:
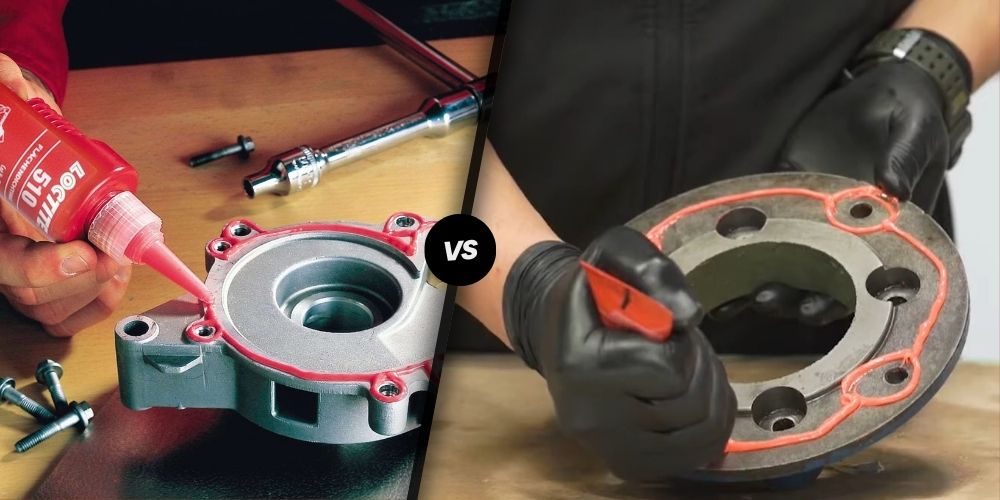
- Dispense a continuous bead of Loctite 510 onto one of the flange surfaces, making sure to encircle all bolt holes.
- The unprimed gap-fill is 0.25 mm (0.01″). If necessary, adjust the bead size to accommodate wider gaps.
- Assembly:
- Assemble the parts within a few minutes to allow the sealant to begin curing.
- If working with passive metals or at low temperatures (below 5°C), consider using LOCTITE® SF 7649 activator to increase the cure speed (Henkel Adhesives).
- Tighten Bolts:
- Tighten the bolts to the recommended torque specifications. The anaerobic curing process will begin once the sealant is confined between the metal surfaces and exposed to the absence of air.
| Step | Tools/Materials Needed |
|---|---|
| Surface Cleaning | Cleaner, Dry Cloth |
| Sealant Application | Loctite 510, Dispensing Tool |
| Assembly and Tightening | Torque Wrench, Bolts |
For more information on preparing surfaces, read our section on preparing surfaces for Loctite 510.
Applying Loctite 515
LOCTITE® 515 is designed for flange sealing and is known for its form-in-place properties. It effectively seals gaps up to 0.25 mm (0.01″) and is commonly used in pumps, thermostats, compressors, transmission housings, and axle covers (Henkel).
- Clean and Prepare Surfaces:
- Thoroughly clean the surfaces to remove any dirt, grease, or contaminants.
- Ensure surfaces are dry before applying the sealant.
- Apply the Sealant:
- Apply a continuous bead of Loctite 515 onto one flange surface, ensuring that all bolt holes are encircled.
- For larger flanges, the sealant can be applied using a roller.
- Assembly:
- Assemble the parts immediately to allow for proper anaerobic curing.
- Excess squeeze-out can be wiped away as it will not cure when exposed to air.
- Fixture Time:
- The typical fixture time for Loctite 515 is around 30 minutes, allowing for adjustments and alignment if necessary.
| Step | Tools/Materials Needed |
|---|---|
| Surface Cleaning | Cleaner, Dry Cloth |
| Sealant Application | Loctite 515, Dispensing Tool, Roller |
| Assembly and Tightening | Torque Wrench, Bolts |
For additional guidelines on disassembling Loctite 515 and maintaining your gasket maker, refer to our respective sections.
By following these best practices, users can ensure optimal performance and longevity of their Loctite gasket makers.
Disassembly and Removal
Understanding how to correctly disassemble and remove gasket makers is essential for maintenance and reapplication. Here’s what you need to know about disassembling Loctite 510 and Loctite 515.
Disassembling Loctite 510
To disassemble Loctite 510, follow these steps:
- Application of Remover: Apply LOCTITE® SF 790 on the old sealant to soften and break down the residue.
- Scraping the Residue: Use a wood or plastic scraper to gently remove the softened residue from the flange surfaces.
- Cleaning: Ensure that all remnants of the old gasket material are thoroughly removed to prepare the surface for a new application.
Steps are validated by Henkel. For best practices when switching sealants, see our article on loctite 510 vs. 518.
Disassembling Loctite 515
For disassembling Loctite 515, the steps are quite similar with slight variations:
- Application of Remover: Apply LOCTITE® SF 790 on the old sealant to assist in breaking down and softening the material.
- Scraping the Residue: Remove the softened sealant from the flange surfaces using a wood or plastic scraper, ensuring you avoid scratching or damaging the metal.
- Bolts and Flanges: Bolts can be removed using standard hand tools. Utilize jacking-screws, cast-on bosses, or recesses to separate and lift the flanges apart.
For details on transitioning between products, see our article on loctite 510 vs. 515.
Following these disassembly steps ensures proper maintenance and prepares the surfaces for the next application. Don’t forget to check related articles for more insights, such as loctite blue vs. red and 3m 08693 vs. 08609.

