How To Use Rubber Cement: Complete Guide
Using Rubber Cement
Rubber cement is a versatile adhesive often used in arts and crafts. Understanding how to properly use it can make a significant difference in the success of your projects. This section will cover methods for achieving both temporary and stronger adhesion.
Temporary Adhesion Methods
Rubber cement is ideal for temporary adhesion, thanks to its ability to form a bond that can be easily removed. This is particularly useful for projects where you need to reposition materials or make temporary fixes.
-
Single Surface Application: Apply an even coat of rubber cement to one surface. Press the surfaces together immediately. This method allows you to easily peel the materials apart later by carefully lifting from one edge. This is useful for items like paper, photos, or lightweight cardstock. For more details, you can explore alternative adhesives like paper cement vs rubber cement.
-
Dry Layer Technique: Apply a thin layer of rubber cement to one surface and allow it to dry completely before pressing the materials together. This creates a bond that is secure but still removable, perfect for temporary projects or mock-ups.
Achieving a Stronger Bond
For a more permanent adhesion, the application technique needs to be slightly adjusted. This ensures that the bond is robust and durable.
-
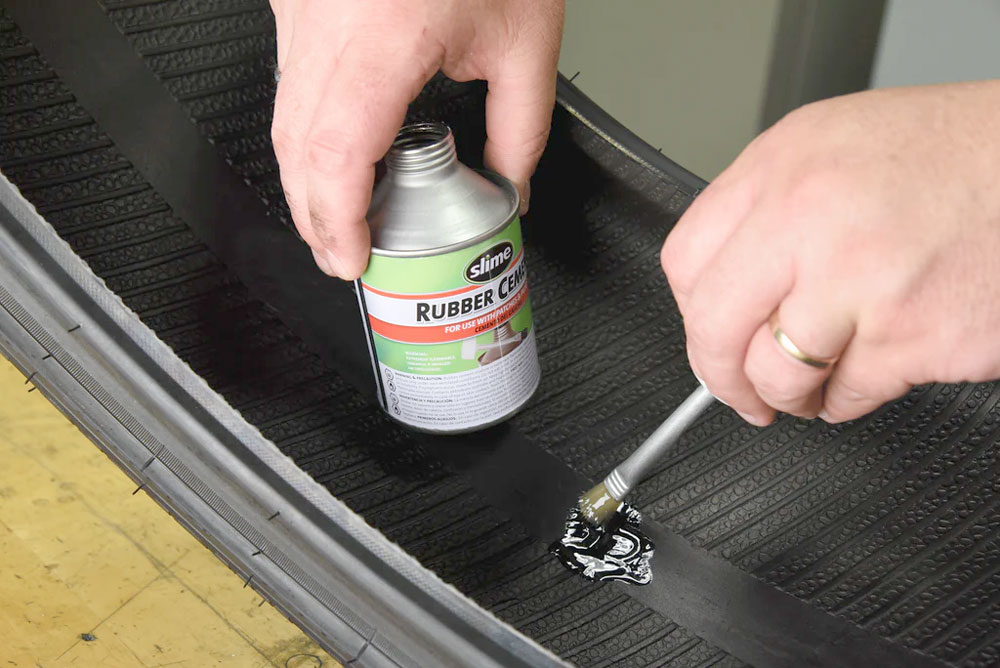
Dual Surface Application: To achieve a stronger bond, apply an even coat of rubber cement to both surfaces that need to be bonded (CraftyGoat). Allow the rubber cement to dry on both surfaces, a process known as “dry-tack.” Once dry, press the surfaces firmly together. This method is particularly useful for woodworking, fabric projects, and more robust crafting needs.
-
Press and Hold: After applying an even coat on both surfaces and allowing them to dry, press the materials together and hold for a few moments. This ensures a stronger bond as the rubber cement adheres to itself.
| Rubber Cement Usage | Technique | Characteristics |
|---|---|---|
| Temporary | Single Surface Application | Easily removable, ideal for repositioning |
| Stronger Bond | Dual Surface Application | Durable, ideal for permanent adhesion |
For other adhesives and their uses, you may find it helpful to check b7000 vs. super glue or e6000 vs. e6000 plus.
Using these methods, you can maximize the effectiveness of rubber cement in your projects, whether you need a temporary fix or a strong, lasting bond. Explore more about adhesive usage and techniques at how to use contact adhesive properly.
Concrete Safety Precautions
When handling concrete, certain safety measures are essential to avoid accidents and ensure the wellbeing of workers. Understanding these safety protocols can help prevent injuries and serious complications.
Handling Procedures
Concrete, being the most common building material, is heavy and can be chemically hazardous. Incorrect handling of concrete or its use without the proper equipment can cause severe injuries (Work-Fit). The following handling procedures can help mitigate these risks:
- Personal Protective Equipment (PPE): Workers should wear appropriate PPE, including gloves, long sleeves, safety glasses, and boots to protect against chemical burns and physical injuries.
- Proper Lifting Techniques: Use proper body mechanics when lifting heavy concrete materials to prevent back injuries. Bend at the knees and keep the back straight.
- Handling Equipment: Utilize machinery such as cranes, forklifts, and wheelbarrows to move large and heavy concrete items. This reduces manual handling injuries.
- Ventilation: Ensure proper ventilation when working in enclosed areas with concrete to avoid inhaling harmful dust and fumes.
Employing these handling techniques helps maintain a safer working environment and reduces the risk of concrete-related injuries.
Importance of Safety Training
Safety training is vital for construction workers who handle concrete, emphasizing the importance of consistent, ongoing education (Work-Fit). Such training ensures that workers are aware of the proper handling techniques and safety measures. Here are key aspects of effective safety training:
- Regular Safety Drills: Conduct regular safety drills to keep workers prepared and informed about emergency procedures.
- Updated Safety Protocols: Ensure that all employees are aware of the latest safety standards and protocols, including the proper use of handling equipment.
- First Aid Training: Provide first aid training so that workers can respond quickly and effectively in case of an accident.
- Hazard Communication: Educate workers on the potential hazards associated with concrete, including chemical burns and inhalation risks.
By emphasizing the importance of safety training and making it a routine part of worker education, employers can create a safer work environment and significantly reduce the number of concrete-related injuries.
For further insights into adhesives and their safe usage, explore our detailed guides on how to use contact adhesive properly or how to use construction adhesive without gun.
Benefits of Cement Board
Characteristics of Cement Board
Cement board is a widely used underlayment that provides a clean and durable surface for tiles, ensuring a flat and reliable foundation. This makes it a preferred choice for many construction and renovation projects (Allura USA).
Some key features of cement board include:
- Moisture Resistance: Effective in managing moisture, making it ideal for high-humidity environments.
- Strength and Stability: Provides a stable base that remains flat and rigid, reducing issues such as lippage and raised tile corners.
- Ease of Installation: Can be scored and snapped with a utility knife, eliminating the need for sawdust cleanup, as required with plywood.
Advantages Over Plywood
Cement board holds several advantages over plywood, particularly in terms of moisture management and durability:
| Feature | Cement Board | Plywood |
|---|---|---|
| Moisture Resistance | High | Low |
| Stability in Humid Conditions | Very Stable | Can Warp |
| Installation Process | Simple (Scored and Snapped) | Requires Sawing |
| Reduction of Tile Issues | Minimizes Lippage | Higher Risk of Raised Corners |
| Clean Up | Minimal | Requires Cleanup of Sawdust |
References: Allura USA
Cement board is particularly recommended for areas prone to moisture, such as bathrooms and kitchens. Its ease of installation and minimal cleanup requirements make it a go-to choice for many professionals. By contrast, plywood can swell and warp when exposed to moisture, making it less reliable in wet or humid conditions.
For more tips on selecting the right adhesive for your projects, explore our comparison articles like e6000 vs. e7000 and masonry adhesive vs. mortar.
Installing Cement Board
Installing cement board correctly is essential for ensuring a sturdy, durable substrate for tile and other finishes. This section covers proper installation techniques and fastener selection guidelines to achieve the best results.
Proper Installation Techniques
Cement board is a popular choice for its ability to provide a flat and rigid surface, avoiding issues like lippage and raised tile corners that can occur with flexible plywood (Allura USA). Here are the techniques for proper installation:
-
Preparation: Start with a clean, dry, and level substrate. Remove any debris or protrusions that may affect the board.
-
Cutting the Board: Cement board can be scored with a utility knife and snapped along the scoreline. This method is quick and produces minimal dust, compared to sawing plywood which requires cleanup (Allura USA).
-
Thinset Application: Apply a coat of thinset mortar to the substrate using a notched trowel. This strengthens the bond between the board and the substrate.
-
Placing the Board: Lay the cement board onto the thinset, pressing firmly into place. Ensure the board is snug against the next piece, leaving a small gap (1/8 inch) for expansion.
-
Fastening: Secure the board with appropriate fasteners (details in the next section). Place fasteners every 8 inches around the perimeter and every 6 – 8 inches across the field of the board, approximately 3/4 inch from the edges.
-
Sealing Joints: Apply alkali-resistant mesh tape to all seams. Cover the tape with a thin layer of thinset mortar, smoothing it out to create a uniform surface.
Fastener Selection Guidelines
Proper fastening is crucial for the durability and performance of cement board. The recommended fasteners include galvanized roofing nails or cement board screws (Allura USA). Using the wrong type can compromise the integrity of the installation.
-
Galvanized Roofing Nails: These provide excellent holding power and corrosion resistance. Ensure they are long enough to penetrate the board and substrate.
-
Cement Board Screws: Designed specifically for cement board, these screws have sharp points and a special threading that grips the board securely.
Table of Recommended Fasteners:
| Fastener Type | Corrosion Resistance | Holding Power | Recommended Usage |
|---|---|---|---|
| Galvanized Roofing Nails | High | Excellent | Perimeter and Field |
| Cement Board Screws | High | Excellent | Perimeter and Field |
For further detailed advice on cement board installation techniques or other adhesive solutions, such as how to use rubber cement or how does contact adhesive work, consider exploring related topics like how to remove construction adhesive from concrete or how to use contact adhesive properly.
Understanding Contact Cement
Characteristics and Uses
Contact cement is a solvent-based adhesive that creates a flexible, permanent, water-resistant, and heat-resistant bond. This type of adhesive is distinctive because it must be applied to both surfaces being bonded together to achieve an effective grip. Here’s a look at its characteristics and uses:
- Flexible bond: Provides elasticity, allowing the materials to maintain some flexibility after bonding.
- Permanent bond: Ensures a long-lasting adherence between surfaces.
- Water-resistant: Makes it suitable for use in areas exposed to moisture.
- Heat-resistant: Withstands high temperatures without compromising the bond.
Contact cement is versatile and can be utilized on various materials, making it a popular choice for various applications.
| Property | Details |
|---|---|
| Bond Type | Permanent and flexible |
| Resistance | Water and heat resistant |
| Surface Application | Both surfaces |
| Material Compatibility | Most materials |
For an in-depth understanding of how contact cement works, visit how does contact cement work.
Ideal Projects for Contact Cement
Contact cement is particularly suitable for projects that require a robust adhesive for large surface areas or complex materials. Below are some ideal projects for using contact cement:
- Vinyl Flooring and Linoleum: Easily adheres these materials to subfloors, providing a durable bond.
- Metal-to-Metal Bonding: Effective in joining metal surfaces together.
- Tile Reattachment: Works well for reattaching tiles in both wet and dry environments.
- Sealing Leaks: Can be used to create watertight seals.
- Veneer and Laminate to Wood: Ideal for applying veneer or laminate to wooden surfaces.
- Shoe Repairs: Useful for minor repairs on footwear.
- Leatherworking: Bonds leather pieces firmly.
- Upholstery and Car Interiors: Attaches upholstery and trim securely in vehicles.
- Countertops: Adheres laminate, metal, or solid surface countertops.
| Project | Description |
|---|---|
| Vinyl Flooring & Linoleum | Adheres to subfloors |
| Metal-to-Metal Bonding | Joins metal surfaces |
| Tile Reattachment | Effective in wet and dry areas |
| Sealing Leaks | Creates watertight seals |
| Veneer & Laminate to Wood | Bonds veneer/laminate to wood |
| Shoe Repairs | Minor footwear fixes |
| Leatherworking | Secures leather pieces |
| Upholstery/Car Interiors | Attaches upholstery and trim in cars |
| Countertops | Bonds laminate, metal, solid surface tops |
For further tips on using contact cement effectively, visit our article on how to use contact cement properly.
Understanding the characteristics and ideal uses of contact cement will ensure you select the appropriate adhesive for your projects, allowing for strong, lasting bonds. For a comparison of different adhesives such as b7000 vs. super glue, refer to our in-depth guides.
Exploring Rubber Cement
Applications of Rubber Cement
Rubber cement is a versatile adhesive known for creating a strong, flexible, and semi-permanent bond between flexible materials such as vinyl, fabric, and rubber, as well as on delicate projects involving paper (Lifehacker). This water-based adhesive can be applied on one or both surfaces being bonded together. Below are some key applications for rubber cement:
- Repairing Book Bindings: Rubber cement is ideal for bookbinding and repair because it provides a flexible hold that won’t damage paper.
- Craft Projects: Commonly used in arts and crafts for sticking paper, photographs, and other lightweight materials.
- Model Building: Perfect for assembling small models of cars, planes, and buildings.
For more information on how to safely use adhesives, check out our guide on how to use contact adhesive properly.
| Material | Application |
|---|---|
| Paper | Craft projects, bookbinding |
| Vinyl | Repairing flexible items |
| Fabric | Crafting and minor repairs |
| Rubber | Minor household repairs |
Ideal Projects for Rubber Cement
Rubber cement is recommended for a variety of projects due to its versatility and flexibility. It is particularly useful in the following scenarios:
- Arts & Crafts: Rubber cement is favored for arts and crafts projects because it allows repositioning of items before the glue sets and it doesn’t wrinkle paper.
- Household Repairs: Suitable for minor repairs involving plastic, metal, wood, or rubber. It provides a strong but flexible bond, ideal for fixing broken items around the house.
- Photograph Mounting: Ideal for mounting photographs on different surfaces without damaging the photos.
- Model Building: Used in building small plastic or paper models due to its ability to bond various materials like plastic and paper without creating a mess.
Rubber cement is gentle on delicate materials like foil and fabric. For a comparison with other strong adhesives, you can explore our detailed articles on E6000 vs Super Glue or Barge Cement vs Rubber Cement.
