Hondabond vs Permatex: Auto Sealant Comparison
Hondabond vs. Permatex
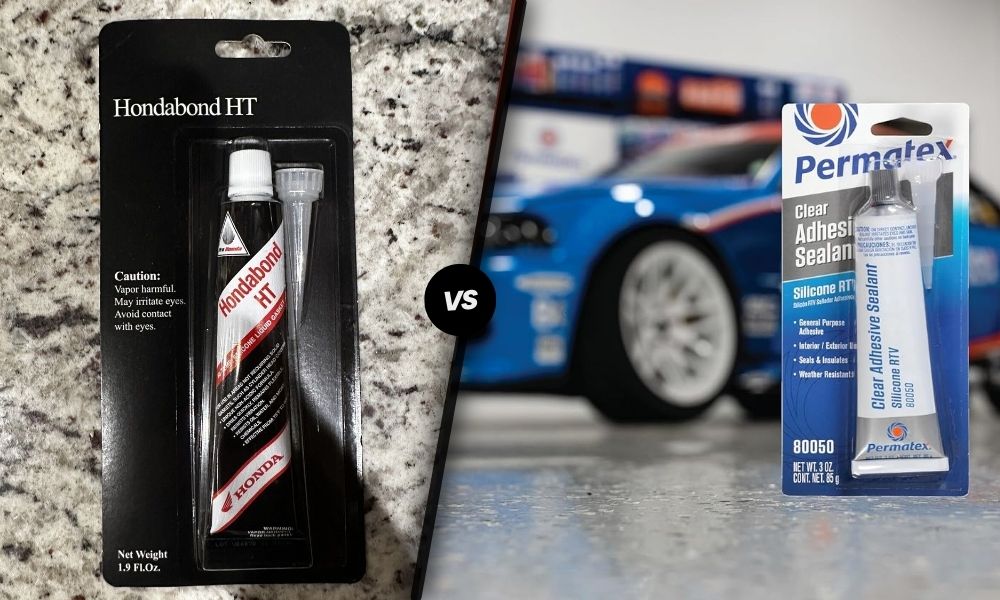
When it comes to automotive sealants, making the right choice can significantly affect the outcome of your project. Here, we explore two popular options: Hondabond and Permatex. Both have their advantages, and understanding their differences can help you decide which is best suited for your needs.
Comparison Overview
Hondabond and Permatex are both well-respected brands in the automotive world, especially for sealing engine components. Each offers unique features and benefits that cater to different applications and preferences.
| Attribute | Hondabond | Permatex MotoSeal 1 Ultimate Gasket Maker |
|---|---|---|
| Color | Gray | Gray |
| Temperature Range | -60°F to 375°F | -65°F to 500°F |
| Cure Time | 24 hours | 24 hours |
| Application Type | Brush-on | Squeeze tube |
| Flexibility | High flexibility | High flexibility |
| Oil Resistance | Excellent | Excellent |
| Adhesion | Superior | Superior |
Application and Usability
Hondabond:
- Brush-on Application: Hondabond is known for its brush-on application method, which allows for more precise control when applying the sealant to specific areas. This can be especially beneficial for complicated components with fine details.
- High Flexibility: The sealant remains highly flexible after curing, making it ideal for parts that experience significant movement or thermal expansion.
- Temperature and Oil Resistance: Effective in temperatures ranging from -60°F to 375°F, Hondabond is highly resistant to oils and other automotive fluids, ensuring a durable seal.
For more specific applications or to compare other adhesives, check our guide on ca glue vs. epoxy.
Permatex MotoSeal 1 Ultimate Gasket Maker:
- Squeeze Tube: Permatex comes in a squeeze tube which simplifies the application process, making it user-friendly, even for those with less experience.
- Higher Temperature Range: This sealant can withstand higher temperatures, up to 500°F, making it suitable for high-heat areas such as exhaust systems.
- Oil Resistance and Flexibility: Similar to Hondabond, Permatex offers high oil resistance and remains flexible after curing, which is essential for maintaining a strong seal under various conditions.
For additional comparisons and guidelines on choosing the best adhesive, visit our article on best adhesive for asphalt shingles.
Selecting between Hondabond and Permatex ultimately depends on the specific requirements of your project. Both products offer high flexibility and excellent resistance to oils and high temperatures. Whether you need the precision of a brush-on application or the convenience of a squeeze tube, understanding the distinguishing features of each product will help you make an informed decision.
Permatex MotoSeal 1 Ultimate Gasket Maker Grey
Features and Benefits
Permatex MotoSeal 1 Ultimate Gasket Maker Grey is an exceptional choice for gasket-related applications, specifically ideal for use on frequently disassembled engines, as well as two and four-cylinder engines. This gasket maker forms a tough, flexible bond that effectively seals even irregular and uneven joint surfaces. A few key features and benefits include:
- Quick Sealing: Fully seals within 20 minutes, enabling quick repairs and assembly.
- High-Temperature Resistance: Capable of withstanding temperatures up to 350°F continuous.
- Chemical Resistance: Resistant to gasoline and other damaging fluids.
- Flexible Bonding: Forms a durable, flexible bond that holds up under challenging conditions.
- Versatility: Suitable for a wide range of engines and disassembly frequencies.
For more detailed comparisons, you can explore other adhesive comparisons such as gasgacinch vs. permatex.
Usage Recommendations
To maximize the effectiveness of Permatex MotoSeal 1 Ultimate Gasket Maker Grey, follow these usage recommendations:
- Surface Preparation: Ensure all surfaces are clean, dry, and free from any oil or grease before application.
- Application: Apply an even bead of the gasket maker to one surface, ensuring complete coverage.
- Assembly: Assemble parts while the sealant is still wet to enable proper adhesion and sealing.
- Curing Time: Allow 20 minutes for initial curing before subjecting the assembly to immediate service or further handling.
Here’s a look at Permatex MotoSeal 1 Ultimate Gasket Maker Grey compared to other products:
| Product Name | Temperature Resistance (°F) | Sealing Time (Minutes) | Chemical Resistance |
|---|---|---|---|
| Permatex MotoSeal 1 Ultimate Gasket Maker Grey | 350 | 20 | Gasoline, fluids |
| Gasgacinch Sealant | 400 | 15 | Mild acids, oil |
| Silicone RTV Sealant | 500 | 30 | Chemicals, oils |
For more insights on various adhesives, take a look at our article on how to use jb water weld.
Understanding how each sealant performs can help in choosing the right product for your specific needs. If you’re looking to explore other adhesive-related topics, consider reading about ca glue vs. epoxy or solvent vs. solvent free adhesive.
Carburetor Rebuilding Insights
Rebuilding a carburetor requires careful attention to detail and the use of high-quality parts. This section covers the importance of quality components and how to avoid common rebuilding mistakes.
Importance of Quality Parts
In the motorcycle industry, experts stress the importance of using high-quality OEM stock or aftermarket replacement rubber parts for carburetors. The presence of ethanol in gasoline is often blamed for the swelling and deterioration of rubber components, but the real culprit is usually the quality of the parts themselves (The Motorcycle Project). Therefore, sourcing components from reputable manufacturers is critical for ensuring the longevity and performance of your carburetor.
When it comes to float valves, using OEM components is particularly significant. Aftermarket float valves often fail to seal properly, leading to fuel leaks and compromised carburetor functionality. For optimal performance, especially for Honda motorcycles, it’s strongly recommended to use factory float valves.
Avoiding Common Rebuilding Mistakes
Rebuilding a carburetor may seem straightforward, but several common mistakes can hinder the effectiveness of the rebuild. Here are some tips to help avoid these pitfalls:
- Excessive Use of RTV Silicone: The use of Room Temperature Vulcanizing (RTV) silicone in gasket applications is beneficial but must be applied correctly. Overusing RTV can result in excess material entering the interior of the carburetor, causing blockages and operational issues (Quora).
- Improper Curing: Failing to allow sufficient time for RTV silicone to cure before assembling components can lead to ineffective sealing. Ensure adequate curing time based on the manufacturer’s recommendations for a durable seal.
- Over-torquing Fasteners: Applying too much torque when fastening components can deform the gaskets, leading to a poor seal. Always use a torque wrench and adhere to specified torque settings to avoid this issue.
- Using Inferior Parts: Some rebuilders opt for complete carburetor rebuild kits, which often contain substandard parts. Professional rebuilders avoid these kits, favoring individual high-quality parts sourced from legitimate suppliers or OEM components for guaranteed performance.
| Common Mistakes | Recommended Practices |
|---|---|
| Excessive RTV Silicone | Use appropriate amounts and ensure proper application |
| Insufficient Curing | Follow manufacturer’s curing time recommendations |
| Over-torquing Fasteners | Use a torque wrench and follow specified settings |
| Using Inferior Parts | Use high-quality, reputable, or OEM parts |
By understanding the importance of quality parts and employing best practices during carburetor rebuilding, one can significantly enhance the performance and reliability of their vehicle. For additional tips and comparisons, such as RTV silicone vs neoprene, ensure you explore our other in-depth articles and guides.
Understanding Gasket Materials
RTV Silicone vs. Neoprene
Gasket materials play a critical role in sealing components and preventing leaks. Among the popular choices are Room Temperature Vulcanizing (RTV) silicone and neoprene.
RTV silicone is highly regarded for its sealing capabilities. It can withstand various temperatures and pressures, making it ideal for engine components and other high-stress environments. RTV silicone hardens at room temperature, creating a durable and flexible seal. In automotive manufacturing, RTV silicone is favored for its cost-saving advantages when applied robotically.
On the other hand, neoprene is a synthetic rubber known for its flexibility and weather resistance. It’s often used in applications requiring water and chemical resistance. However, while neoprene is versatile, it may not offer the same high-temperature stability as RTV silicone.
| Property | RTV Silicone | Neoprene |
|---|---|---|
| Temperature Range | -60°F to 500°F | -40°F to 250°F |
| Flexibility | Excellent | Good |
| Chemical Resistance | Good | Excellent |
| Application | High-temperature parts | Water seals, chemical environments |
Best Practices for Application
To achieve an effective seal with gasket materials, certain best practices must be followed.
Preparing the Surface
Before applying RTV silicone or neoprene gaskets, the surface must be clean and free of oils, old gasket material, or debris. Any contaminants can compromise the seal.
Applying RTV Silicone
When using RTV silicone, applying the correct amount is crucial. Excess silicone can squeeze out and enter internal components, causing potential issues. Apply a thin, even bead around the perimeter of the part to be sealed. Allow the RTV silicone to partially cure, usually for about 10-15 minutes, before assembling the parts to avoid material displacement (Quora).
Avoid over-torquing fasteners, as this can deform the gasket and lead to sealing failure.
Using Neoprene Gaskets
Neoprene gaskets typically come pre-cut and should be installed according to the manufacturer’s instructions. Ensure the gasket is aligned correctly before tightening bolts. Use a cross-pattern when torquing the bolts to distribute the pressure evenly and avoid deforming the gasket.
For more information on adhesive comparisons, check out our articles on metal glue vs. welding and ca glue vs. epoxy. Additionally, for applications involving water seals, see our guide on aquaseal vs. shoe goo and for elastomeric caulking, read about the differences between elastomeric caulk vs. silicone.
By understanding the differences between RTV silicone and neoprene, and following best practices for their application, one can ensure optimal sealing performance and durability.
Unique Features of Honda S90 Motorcycles
Engine Case Designs
The Honda S90 motorcycle is notable for its evolving engine case designs. Throughout its production, the Honda S90 experienced three distinct sets of engine case designs. Each design iteration had significant differences that were not interchangeable with the others, marking a unique evolution in the motorcycle’s engineering.
- Initial Design (1964): The first engine case design featured specific elements that were only present in early models. These included unique clutch covers, oil pump configurations, and filter screens.
- Mid-Production Adjustments: During the mid-production phase, Honda made several adjustments to improve the performance and reliability of the S90. This included changes to the transmission series, cylinder heads, and intake manifolds.
- Final Design: The final set featured further refinements, optimizing the air filter systems and carburetors to enhance overall engine efficiency. For individuals restoring these motorcycles, these variations mean that parts from different production phases might not be compatible, necessitating meticulous part selection.
Engine Case Design Variations
| Design Phase | Key Features |
|---|---|
| Initial Design | Unique clutch covers, original oil pump configurations |
| Mid-Production Adjustments | Upgraded transmission, redesigned cylinder heads |
| Final Design | Optimized air filter systems, refined carburetors |
Evolution of Engine Components
The Honda S90’s engine components underwent significant evolution over its production years, reflecting Honda’s commitment to innovation and performance enhancement.
- Early Models (1964): The Honda S90 originally featured the 87cc Overhead Cam (OHC) engine, which was a significant upgrade from the pushrod C/CT200 engine. This marked the beginning of a 20-year production run for the OHC engine design, starting in 1964.
- CL90 Introduction (1967): By 1967, Honda introduced the CL90 versions, which incorporated major redesigns to enhance durability and performance. This included modifications to the camsprocket springs and weights, cylinder heads, and a more efficient intake manifold.
- Extended Production: The OHC engine design was so successful that it continued to be used in various models, including the CT110, well into the early 1980s. This long production run underlines the robustness and reliability of the engine design.
Evolutionary Milestones
| Model Year | Key Component Changes |
|---|---|
| 1964 | Introduction of the 87cc OHC engine replacing pushrod engine |
| 1967 | Major redesign for CL90, including upgraded camsprocket springs and cylinder heads |
| Early 1980s | Continued use in CT110 models, showcasing the engine’s reliability |
For those interested in learning more about the differences between various adhesives and sealants in automotive applications, check out our comparison of gorilla spray adhesive vs. 3m 77 and gasgacinch vs. permatex for detailed insights.
Performance Enhancements for Honda CT90
Upgrading with Performance Parts
Upgrading your Honda CT90 with performance parts can significantly enhance its capabilities. One popular upgrade is the installation of a performance camshaft, such as the one offered by DRATV.com for approximately $40. This performance camshaft extends cam timing without changes in the base circle or valve lift, resulting in improved power and performance (MrHonda).
Coupling the performance camshaft with a big bore piston kit can further enhance the performance of your Honda CT90. This combination allows for increased engine displacement, leading to more power and better overall performance. It’s essential to choose quality parts and ensure they are correctly installed to maximize the benefits of these upgrades.
Enhancing Engine Performance
To further enhance the engine performance of your Honda CT90, it’s crucial to focus on various aspects of the engine and exhaust system. Here are some key components to consider:
- Exhaust System: Upgrading the exhaust system can increase airflow and reduce backpressure, leading to improved performance. Consider high-performance exhausts that are designed specifically for the CT90.
- Carburetor Rejetting: Rejetting the carburetor can optimize the air-fuel mixture, allowing the engine to run more efficiently. This process involves replacing the existing jets with ones that are better suited to the enhanced engine setup.
- High-flow Air Filter: Replacing the stock air filter with a high-flow air filter can increase the amount of air entering the engine, resulting in better combustion and more power. Ensure that the air filter is compatible with your specific model of the CT90.
- Ignition System: Upgrading the ignition system, including spark plugs and ignition coils, can improve engine efficiency and responsiveness. High-performance spark plugs can provide a stronger spark, leading to better combustion.
| Performance Part | Average Cost |
|---|---|
| Performance Camshaft | $40 |
| Big Bore Piston Kit | $80 – $150 |
| High-performance Exhaust | $200 – $300 |
| High-flow Air Filter | $25 – $50 |
| Ignition System Upgrades | $20 – $60 |
Ensuring proper installation and tuning of these performance parts is vital. Consulting with a professional mechanic or following detailed guidance can help achieve optimal results. For more insights on quality parts and avoiding common mistakes, visit our carburetor rebuilding insights.
Remember, enhancing your Honda CT90’s performance is a combination of using the right parts and proper maintenance. By focusing on these aspects, you can enjoy a significantly improved riding experience.
For more information on related topics, consider exploring our articles on metal glue vs. welding and conductive glue vs. solder.

