Glue All vs School Glue: Best Uses Compared
Comparing Glue Types
When selecting between school glue and Glue-All, understanding their unique characteristics and applications can be crucial. This section will delve into the differences, strengths, and appropriate uses of these adhesives.
School Glue vs. Glue-All
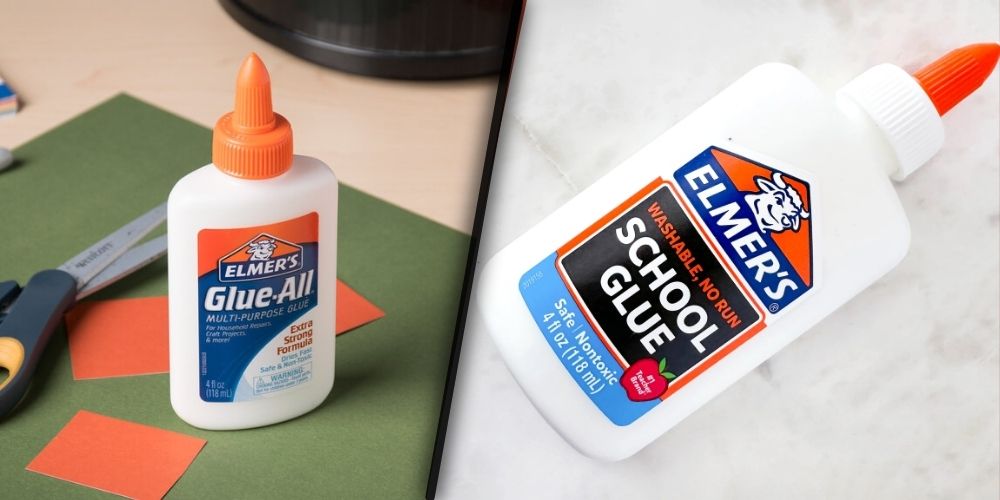
School glue, often recognized for its practical use in educational settings, is designed to be kid-friendly and easily washable. On the other hand, Glue-All is marketed as a multipurpose adhesive with broader applications.
| Aspect | School Glue | Glue-All |
|---|---|---|
| Composition | Petrochemical-based polyvinyl acetate | Petrochemical-based polyvinyl acetate |
| Thickness | Thinner and wetter | Thicker |
| Drying Time | Slower drying time | Quicker drying time |
| Clean-Up | Washes off with water when dried | Washes off less easily after drying |
| Flexibility When Dry | More pliable | Less pliable |
Properties and Uses:
School Glue: Developed for ease of use in schools, this glue is suitable for lightweight crafts and projects where minimal adhesive strength is needed. Its formula ensures it dissolves easily, thins well for spray applications, and dries clear, making it ideal for scenery modeling and repairs.
Glue-All: Intended for more demanding tasks, Glue-All is thicker and dries faster, providing stronger bonds for a variety of materials, including wood, paper, and fabric. Its versatile nature makes it suitable for home repairs, carpentry, and heavier crafts.
Drying Time and Clean-Up:
Drying Time: School glue typically takes longer to dry, which can be beneficial for projects where adjustments are needed before the adhesive sets. Conversely, Glue-All dries more rapidly, making it ideal for tasks requiring quick adhesion, although it can take 24 hours or more to fully cure (Quora).
Clean-Up: The easy washability of school glue ensures that it’s ideal for environments with children. Glue-All, while still washable, is more resistant once dried, necessitating more effort for complete removal.
Exploring these differences thoroughly can aid in selecting the appropriate adhesive for specific needs. For more insights on different adhesives and their uses, consider reading about ca glue vs. epoxy and metal glue vs. welding.
Understanding the unique properties of school glue and Glue-All will help in choosing the right adhesive for your next project. For further information about adhesive comparisons, check out our articles on how to use jb water weld and pva glue vs. elmer.
Characteristics of School Glue
Elmer’s school glue is a versatile adhesive that many find indispensable for various craft and classroom applications. In this section, we delve into the properties and uses of school glue, as well as its drying time and clean-up process.
Properties and Uses
School glue, often referred to as Elmer’s glue, is prized for several key properties:
- Dissolvability: School glue dissolves easily in water, making it ideal for projects requiring adjustable or removable bonds. This characteristic makes it excellent for ballast and scenery modeling.
- Ease of Thinning: The adhesive can be thinned with water to achieve the desired viscosity, allowing users to apply it with a spray bottle or brush.
- Transparency: Once dry, school glue becomes clear, which is beneficial for projects where a visible residue is undesirable.
- Forgiving Nature: The adhesive is forgiving if changes or repairs are needed, making it suitable for beginner and professional use alike.
School glue finds application in a variety of projects, including:
- Crafting: Ideal for paper crafts, scrapbooking, and other artistic endeavors.
- School Projects: Frequently used by students for assignments or model building.
- Decorative Work: Suitable for affixing lightweight materials like glitter, feathers, and fabric.
Drying Time and Clean-Up
Drying time and clean-up are important aspects to consider when using school glue:
- Drying Time: School glue typically takes about 30 minutes to 1 hour to become tack-free. For complete drying and curing, it can take 24 hours or more, depending on factors like temperature, humidity, and the thickness of the application. It’s recommended to allow it to dry for a full 24 hours before subjecting it to stress or use.
| Glue Type | Tack-Free Time | Full Cure Time |
|---|---|---|
| Elmer’s School Glue | 30 minutes – 1 hour | 24 – 36 hours |
- Clean-Up: One of the advantages of using school glue is the ease of cleaning. Since it is water-soluble, it can be easily removed from surfaces and hands with soap and water before it fully dries. This makes it a convenient choice for projects involving children.
For advice on handling different types of adhesives and their properties, you can visit our article on ca glue vs. epoxy and conductive glue vs. solder.
School glue remains a staple in many households due to its versatile and forgiving nature. Whether for school projects, crafts, or light repairs, it continues to be a reliable adhesive option. To learn more about different adhesives and their uses, check out our guide on pva glue vs. elmer.
Characteristics of Glue-All
Understanding the properties and uses of Elmer’s Glue-All helps in determining its best applications. Glue-All, introduced in 1947, has evolved in composition and application over the years.
Composition and Applications
Elmer’s Glue-All was originally formulated with casein, a protein extracted from dairy. However, in 1968, its composition changed to petrochemical-based polyvinyl acetate (PVA) (Quora). This change enhanced its versatility and bonding strength, making it suitable for a wide range of applications.
Glue-All is ideal for tasks that require a strong bond. It’s commonly used for:
- Woodworking projects
- Paper and cardboard adhesion
- Fabric repairs
- Ceramic and pottery fixes
Notably, its strong adhesion makes it more suitable for projects that require a durable and lasting bond, compared to School Glue. To explore differences, see glue all vs. school glue.
Drying Time and Versatility
The drying time of Elmer’s Glue-All varies based on several factors including temperature, humidity, and the thickness of the application. Typically, it becomes tack-free within 30 minutes to 1 hour, but can take up to 24 hours or more to fully dry and cure (Quora).
| Drying Stage | Time (Approximate) |
|---|---|
| Tack-Free | 30 minutes to 1 hour |
| Fully Cured | 24 hours or more |
Despite the drying time, Glue-All’s versatility makes it a favored choice for various projects, especially those needing a robust bond. Its PVA composition allows it to adhere well to different materials while remaining flexible when dry. For tips on achieving strong bonds with adhesives, visit our section on best practices for strong bonds.
Glue-All’s properties make it an excellent adhesive for not only everyday tasks but also more extensive projects that demand reliability and strength. For a detailed comparison with other adhesives, check out conductive glue vs. solder or metal glue vs. welding.
Practical Uses of Glue Dots
Cost-Effectiveness and Mess-Free
Glue dots are an excellent choice for individuals seeking a cost-effective and clean alternative to traditional glue guns. These adhesive products provide a mess-free application, making them ideal for various crafting and bonding projects. Unlike glue guns, which can be cumbersome and produce sticky residues, glue dots offer a straightforward and tidy solution. According to the Chicago Tribune, glue dots do not produce fumes, are non-toxic, and pressure-sensitive, eliminating the need for drying time typically associated with other adhesives.
| Feature | Glue Dots | Glue Guns |
|---|---|---|
| Application | Mess-free | Potentially messy |
| Toxicity | Non-toxic | May produce fumes |
| Drying Time | None required | Varies |
| Cost-Effectiveness | High | Moderate |
Choosing the Right Tack Level
Selecting the appropriate tack level for your project is crucial to ensure the durability and effectiveness of the bond. Glue dots come in varying levels of tack, which determine their stickiness and holding strength:
- Low Tack: Suitable for small crafts, delicate papers, and lightweight materials. These glue dots provide a temporary bond that can be easily removed without damaging the surface.
- Medium Tack: Ideal for general crafts, scrapbooking, and moderate-weight items. Medium tack glue dots offer a more secure hold while still being relatively easy to reposition.
- High Tack: Best for heavier materials such as wood, glass, and metal. High tack glue dots provide a strong and permanent bond, ideal for more demanding projects.
| Tack Level | Suitable For | Bond Strength |
|---|---|---|
| Low Tack | Small crafts, delicate papers | Temporary |
| Medium Tack | General crafts, scrapbooking | Secure |
| High Tack | Heavy materials, wood, metal | Permanent |
Choosing the right tack level is essential, as using an inappropriate tack can compromise the durability and effectiveness of the final product. Additionally, while glue dots are convenient, they do generate packaging waste, which should be considered when planning your projects.
For individuals weighing the pros and cons of glues for different applications, check out our comparison articles on 3m 4000 vs. 4200 marine adhesive and 3m 90 vs. gorilla spray adhesive. These resources provide valuable insights for making informed choices tailored to your specific needs.
Glue Guns vs. Glue Dots
When choosing between glue guns and glue dots for various projects, it’s important to consider their bond strength, surface suitability, safety, and convenience.
Bond Strength and Surface Suitability
Glue guns and glue dots each have their unique advantages in terms of bond strength and the surfaces they adhere to:
| Attribute | Glue Guns | Glue Dots |
|---|---|---|
| Bond Strength | High | Moderate |
| Surface Suitability | Various materials including wood, metal, and plastic | Light materials such as paper and fabric |
| Dry Time | Quick | No drying time needed |
| Tack Level | Fixed | Variable (low-tack to high-tack) |
Glue guns provide a strong and durable bond, making them suitable for heavyweight materials like wood, metal, and plastic. However, glue dots are a convenient, mess-free alternative that offers different levels of tack for various projects. They are particularly effective for lightweight materials and small crafts (Chicago Tribune).
Safety Concerns and Convenience
Safety and convenience are key considerations when working with adhesives:
| Factor | Glue Guns | Glue Dots |
|---|---|---|
| Safety Risks | Burn risk, fume production | Non-toxic, no fume production |
| Convenience | Requires power outlet, can be messy | Easy to use, mess-free |
| Portability | Less portable due to power requirement | Highly portable |
Glue Guns:
- Safety Risks: Glue guns pose risks such as burns from the hot glue and potential fumes when heating the glue (Chicago Tribune).
- Convenience: The need for a power outlet can limit mobility and flexibility. Glue guns can also be messy, especially if the glue strings create unwanted residue.
Glue Dots:
- Safety Risks: Glue dots are non-toxic and do not produce fumes, making them a safer choice, especially for children.
- Convenience: Being easy to use and mess-free, glue dots are highly convenient for quick, one-time tasks. The absence of dry time and the ability to choose varying levels of tack further enhance their usability (Chicago Tribune).
For those seeking a practical, mess-free adhesive option, glue dots with their varying tack levels provide a versatile solution. Meanwhile, glue guns offer a robust bond for more demanding applications. Depending on the project at hand, one might prefer the strength and durability of a glue gun or the convenience and safety of glue dots.
For more insights on different adhesives, explore our articles comparing 3m 4000 vs. 4200 marine adhesive, 3m 90 vs. gorilla spray adhesive, and conductive glue vs. solder.
Tips for Effective Glue Usage
When using adhesives like Glue-All or School Glue, effective use is crucial for achieving strong, reliable bonds. Adhering to best practices ensures that your projects turned out both aesthetically pleasing and structurally sound.
Drying Time Considerations
Understanding the drying time is fundamental to effective glue usage. Elmer’s glue typically takes about 30 minutes to 1 hour to become tack-free but can take 24 hours or more to fully dry and cure, depending on factors such as temperature, humidity, and the thickness of the application (Quora).
Here’s a breakdown of recommended drying times:
| Task | Initial Set Time | Full Cure Time |
|---|---|---|
| Basic Craft Projects | 30 min – 1 hr | 24 hrs |
| Woodworking | 1 hr | 24 hrs – 36 hrs |
For best results, allow adhesives to fully cure before subjecting them to stress or use. For more detailed comparisons, see our article on PVA glue vs. Elmer.
Best Practices for Strong Bonds
To ensure a strong, durable bond between surfaces, consider these best practices:
Clean Surfaces: Ensure the surfaces to be glued are clean and free from dust, grease, or other contaminants. This improves the adhesive’s ability to stick.
Surface Preparation: For smooth surfaces, lightly sanding the area can increase adhesion.
Even Application: Apply the glue evenly to avoid weak spots. For porous surfaces, diluting the glue 50/50 with water can improve penetration and bonding strength.
Pressure: Use clamps or weights to hold the pieces together while the glue dries. This ensures a stronger bond, especially for woodworking projects.
Avoid Excess Glue: Too much glue can extend drying times and weaken the bond. Wipe away excess glue immediately.
Temperature and Humidity: High humidity and low temperatures can significantly increase drying times. Ensure a controlled environment or allow extra time for the glue to fully cure.
For specific tips related to various adhesives, consider exploring our articles on Gorilla Spray Adhesive vs. 3M 77 and Conductive Glue vs. Solder.
By following these tips, you can maximize the effectiveness of your glue and ensure robust and lasting bonds in your projects. For additional insights and safety tips, refer to our detailed guide on how to use JB Water Weld.
