How to Use E6000 Glue on Plastic: Pro Guide
Understanding E6000 Glue
Features of E6000 Glue
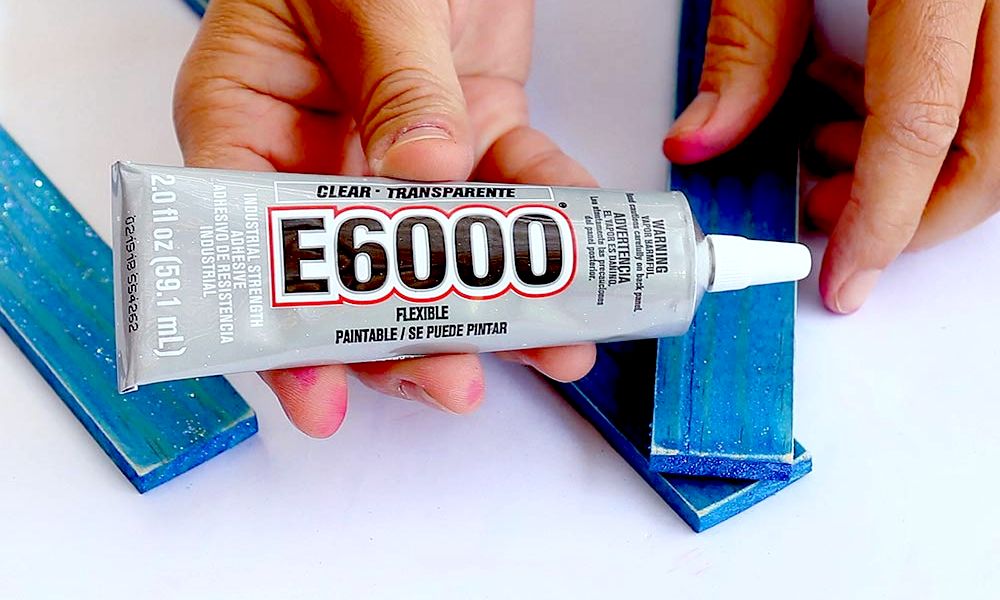
E6000 Glue is known for its versatility and strong bonding capabilities. It’s a premium adhesive that excels in bonding various materials, including plastics commonly used in 3D printing, polycarbonate, PVC, ABS, acrylics, polystyrene, and fiberglass. Beyond plastics, E6000 also provides robust bonds to other materials like wood, metal, fabric, ceramic, glass, cement, and clay.
Key Features:
- Enhanced Adhesion Promoters: E6000 is formulated with enhanced adhesion promoters, allowing it to bond plastics that other adhesives struggle with.
- Washer and Dryer Safe: This makes E6000 suitable for applications where exposure to these conditions is expected.
- Pliable After Curing: The glue remains flexible even after curing, permitting adjustments and disassembly of parts months or even years later. Excess glue can be removed once dry.
- Compatibility Limitations: It is important to note that E6000 is not recommended for use on polystyrene, polyethylene, polypropylene, Styrofoam™, or paper products. It may also damage finished surfaces, so contact should be avoided until the glue is completely dry.
Applications of E6000 Glue
E6000 Glue’s exceptional bonding properties make it ideal for a wide range of applications. Given its strong adhesion and versatility, it is suitable for both household and industrial uses.
| Material | Applications |
|---|---|
| Plastics (e.g., PVC, ABS, Acrylic) | 3D printing, Plastic repairs, Model making |
| Wood | Furniture repair, Craft projects |
| Metal | Jewelry making, Small metal repairs |
| Fabric | Textile repairs, Crafting |
| Ceramic | Pottery repairs, Decorative items |
| Glass | DIY projects, Glass repairs |
| Cement | Small construction jobs, Masonry repairs |
| Clay | Art projects, Sculpting |
When considering how to use E6000 glue on plastic, it’s essential to understand its broad compatibility with various types of plastics and its limitations. For more details on the differences between various glue types, visit our comparison articles like 527 glue vs e6000.
To maximize the effectiveness of this adhesive, proper application and curing techniques are crucial. For a more detailed guide on using E6000 on plastics, see our step-by-step instructions in the Using E6000 Glue on Plastic section. And always remember to handle glue with care, following our tips on handling E6000 glue safely and ensuring proper ventilation.
Using E6000 Glue on Plastic
Compatibility with Different Plastics
E6000 glue is known for its versatility and strong bonding capabilities. It works exceptionally well with various types of plastics commonly used in crafts, 3D printing, and DIY projects. Below is a list of plastics compatible with E6000, as well as those it struggles to adhere to:
| Plastic Type | Compatibility |
|---|---|
| Polycarbonate | Compatible |
| PVC | Compatible |
| ABS | Compatible |
| Acrylics | Compatible |
| Polystyrene | Compatible |
| Fiberglass | Compatible |
| Polypropylene | Not Compatible |
| Polyethylene | Not Compatible |
| TPO Elastomers | Not Compatible |
| Ultra-High-Molecular-Weight Polyethylene | Not Compatible |
The glue’s effectiveness on these plastics can be attributed to the enhanced adhesion promoters within its formula, allowing it to bond better than many other adhesives. However, it does not bond well to inert surfaces like polypropylene, polyethylene, and TPO elastomers (Quora).
Step-by-Step Application Guide
Using E6000 glue on plastic involves several important steps to ensure a strong and durable bond. This guide provides a detailed explanation of how to correctly apply E6000 glue on plastic surfaces:
-
Prepare the Surface:
- Sand the plastic surfaces to be bonded lightly. This helps in creating a rough texture for better adhesion.
- Clean the surfaces to remove any dust, oils, or debris. Ensure they are thoroughly dry.
-
Apply the Glue:
- Squeeze a small amount of E6000 glue onto one of the surfaces. Spread it evenly.
- Optionally, you can apply a thin layer to both surfaces for an even stronger bond.
-
Wait:
- Allow the glue to sit for about 5 minutes. This waiting period helps the adhesive become tacky, which enhances bonding.
-
Join the Pieces:
- Press the two plastic surfaces together firmly. Ensure they are aligned properly.
-
Clamp the Pieces:
- Use clamps to hold the pieces in place. Clamping ensures that the bond is secure and the glue penetrates properly into both surfaces.
-
Cure the Glue:
- The initial setting time for E6000 glue is between 10 to 15 minutes (Quora).
- For a full cure, leave the clamped pieces undisturbed for at least 24 to 72 hours. The curing time can vary depending on the materials bonded and environmental conditions. Overnight curing is generally recommended for the best results.
By following these steps, you can ensure that your plastic items are securely bonded and maintain their integrity over time. For more information on maintaining your bonded items, explore our articles on liquid nails vs. pl premium and loctite pl 500 vs. pl premium.
Curing and Setting Times
Setting Time of E6000 Glue
The initial setting time of E6000 glue is a crucial factor in determining how long the surfaces need to be held in place. E6000 typically begins to get tacky within approximately 2 minutes and sets in about 10 to 15 minutes (Eclectic Products).
| Attribute | Time |
|---|---|
| Tacky Time | ~2 minutes |
| Setting Time | ~10-15 minutes |
| Washer/Dryer Safe | Yes (Eclectic Products) |
Curing Time for Strong Bonds
For the best results, E6000 glue requires an extended curing period to reach maximum strength.
E6000 begins to cure within 24 hours, with full curing taking between 48 to 72 hours, depending on the materials and environmental conditions (E6000 Premium). For high-stress points, such as the inside of armor pieces, it’s recommended to allow a full 24-hour curing period before use (White Armor).
| Curing Attribute | Time |
|---|---|
| Initial Cure Time | 24 hours |
| Full Cure Time | 48-72 hours |
| High-Stress Points | 24 hours (White Armor) |
For an optimal bond, make sure to factor in the full curing time, especially in applications where the bond will experience stress or movement. For additional insights on adhesives and their properties, check out our articles on liquid nails vs. PL premium and Loctite 510 vs. 515.
Cleaning and Maintenance
Cleaning Uncured E6000 Glue
Proper maintenance of tools and surfaces is essential when working with E6000 glue. When the adhesive is still uncured, it can be easily cleaned, preventing any undesirable stickiness or residue.
Methods for Cleaning Uncured E6000:
- Rubbing Alcohol: Effective for cleaning uncured E6000 from surfaces.
- Mineral Spirits: Gently cleans the adhesive without damaging the surface.
- Acetone: Quickly dissolves uncured glue.
- Dry Cloth: Can be used for initial wiping before applying any solvent.
Employing these methods will ensure that any inadvertent spills or excess adhesive are promptly addressed, maintaining a clean working environment.
Tips for Removing Cured Glue
Once E6000 has cured, removal becomes more challenging but not impossible. Here are effective strategies for dealing with cured E6000 glue:
Method for Removing Cured E6000:
- Mineral Spirits: Softens cured adhesive for easier removal.
- Cutting or Scraping: Physically remove the adhesive using a sharp blade or scraper.
- Acetone and Citrus-based Solvents: Useful for breaking down cured glue in small amounts.
Implementing these techniques will facilitate the maintenance of your project and tools, ensuring that cured glue does not compromise the finish or functionality of your work. For more on the best adhesives and comparisons, check out our articles on liquid nails vs PL premium and contact cement vs epoxy.
Best Practices and Tips
Sanding and Preparation
When using E6000 glue on plastic, proper preparation is crucial for achieving a strong bond. Follow these recommended steps:
- Sand the Area: Lightly sand the surfaces to be glued to create a rough texture, which helps improve adhesion.
- Remove Dust and Debris: Clean the sanded area to ensure it’s free from dust, grease, or any other contaminants that could affect the glue’s performance.
- Apply the E6000 Glue: Apply a moderate amount of E6000 glue to the surfaces you want to bond.
- Wait for 5 Minutes: Allow the glue to sit for about 5 minutes to become tacky.
- Join the Pieces: Press the pieces together firmly.
- Clamp the Parts: Clamp the joined pieces securely to keep them in place while the glue sets.
- Cure Overnight: For best results, let the glue cure overnight.
Refer to sources like White Armor for additional tips and insights on using E6000 glue.
Clamping and Drying Recommendations
Proper clamping and drying methods ensure that the E6000 glue creates a durable bond. Here are essential recommendations:
-
Tack Time and Setting: E6000 glue starts getting tacky in approximately 2 minutes and begins setting in around 10 minutes (Eclectic Products).
-
Full Curing Time: It takes between 24 to 72 hours for a full cure, with temperature and humidity affecting dry time (Eclectic Products).
-
Flexibility After Curing: The glue stays pliable even after curing, allowing for adjustments and disassembly of parts months or even years later.
-
Optimal Cure Time: For high-stress points, such as the inside of shins in armor, it is advisable to wait a full 24 hours before use. Using a heat gun set at 450 degrees for 20-30 seconds can help in softening the glue for adjustments.
By following these techniques, you can ensure strong and reliable bonds when using E6000 glue on plastic. For more information on adhesive comparisons, check out our articles on 527 glue vs E6000 and barge cement vs contact cement.
Safety Precautions
Ensuring safety while using E6000 glue is paramount due to the potential health risks and hazards associated with its components. Below are essential safety measures to consider.
Handling E6000 Glue Safely
E6000 adhesive contains tetrachloroethylene, which can decompose into phosgene—a highly toxic substance. Handle the glue with caution to avoid health risks. Follow these safety tips:
- Avoid Heat Sources: Never use E6000 glue near open flames, heat sources, or while smoking.
- Protect Skin and Eyes: Use gloves and safety goggles to prevent direct contact with skin and eyes.
- Use Proper Tools: Apply the glue using appropriate tools to avoid accidental skin exposure.
- Store Safely: Keep E6000 in a cool, dry place away from children and pets.
Ventilation and Health Considerations
Ventilation is crucial when using E6000 glue to avoid inhaling harmful vapors that can affect the central nervous system (Quora). Ensure a well-ventilated workspace:
- Work Outdoors or in a Well-Ventilated Area: If possible, work outside. If working indoors, open windows and doors to ensure good airflow.
- Use Fans: Position fans to direct fumes away from the workspace and towards open windows.
- Consult MSDS: Refer to the Material Safety Data Sheet (MSDS) for detailed safety information and recommended guidelines (Quora).
Using E6000 glue safely involves understanding its properties and taking appropriate precautions. For more information on different adhesives, visit our articles on 527 glue vs e6000 and gem tac vs. e6000.
